Showing posts with label Gunsmithing. Show all posts

Saturday, December 28, 2019

I Don't Like Working on CZ-75s

I took my CZ-75B SA apart yesterday afternoon.  Today, I polished the trigger bow and sides of the hammer.  I reduced the hammer hooks some, and changed the sear angle a bit.  Good news is that I got the pull weight down a few ounces.  Bad news is that there's still pretty much the same amount of creep, and the hammer still cams back when I pull the trigger.  I'm going to have to take it apart, cut the hammer some more, and get it all back together again.  I will probably hold off on the sear angle until after I check to see if the hammer/sear engagment is even on both sides.

I'm not looking forward to this.  There are a lot of little parts and springs and pins in these Czech pistols.

I've worked on 10/22s, AR-15s, and AKs.  I even managed to take an M1 Garand apart, and get it back together properly a couple times.  I've done trigger jobs on a good half a dozen Glocks and a couple 1911s, and replaced the leaf hammer springs in Colt and S&W revolvers.  The CZ-75 wins for being the most fiddly and frustrating auto to work on, and my single-action doesn't even have a decocker, which I'm told are even more fiddly and frustrating than the thumb safety pistols.

Thursday, December 13, 2018

Glock Triggers - OEM, Vickers, Apex

I noticed that the Apex trigger seemed to offer a longer length-of-pull.  Having a few different ones on hand, I tried to line up a few on a sight in target to show how they compare.  Connector is the same for all photos.  Frame is a Polymer80, but in comparing the triggers to each other, and nothing else, this shouldn't matter.

OEM plastic Glock trigger:

Vickers/TangoDown plastic trigger:

Apex trigger:


I have large hands, and I like the additional length-of-pull that the Apex offers at least for the 9mm/.40 frames, and it reduces the trigger pull by a few ounces.  The trigger safety dingus will go flush or below flush with the face of the trigger when depressed, and is quite comfortable.

The Vickers safety dingus sticks out when depressed, and the toe is a bit sharp, which can be irritating, and could possibly cause a blister during a pistol class or a high-round-count shooting session.  The Vickers trigger is about half the price of the Apex ($35 vs. $75), but I still prefer the Apex.

Saturday, December 30, 2017

Last Photo of Rock Island G.I. Before Cutting On It


Posting one last picture of the Rock Island FS GI 9mm before I start to cut on it.  I haven't changed much since I posted the review, with the exception of the stainless EGW National Match barrel bushing, which you can kinda see in the photo here. 

I don't really need to change the trigger, but I want the black trigger for a stainless frame pistol, to be completed later, maybe 2019.  I'm going to need to change the pre-travel adjustment for the new hammer and sear anyway.

It will be getting a new grip safety also, but I'm not going to show that just yet.  The G.I. grip safety isn't so bad, after you "melt" it a little bit, but the web of my hand gets hooked on the frame tangs sometimes, which keeps me from getting a consistent grip.

I now have a milling machine in the basement, so will be doing most of the work myself.  I think I may hand off the slide to a local gunsmith for staking the front sight.  I don't want a dovetailed front sight for this particular pistol.  I want to use the Bo-Mar front sight and I don't particularly want to buy or make a staking tool just for this one job.  I also want the job done well the first time, since I can't just order another Bo-Mar front sight from Brownell's, Midway, or from the manufacturer.

Friday, February 10, 2017

Rock Island 1911 FS GI 9mm Review

Rock Island 9mm with some minor modifications

I picked up a Rock Island Armory 1911A1 5" FS (full-size, i.e. 5" Government Model) GI 9mm pistol from Sarco for about $430 with tax and transfer.  It's basically a replica of a Post-1985 Colt Series 70 pistol, not really a replica of anything that was issued by the U.S. military, at least not in large numbers.  The ejection port is lowered an flared, and the the thumb safety has a little bit of a shelf, rather than the little bitty tab of the G.I. thumb safety.  I didn't want the Tactical model, because the grip safeties do not fit very well, the triggers are not adjustable for pre-travel, and I didn't want to use Novak-type sights.  The RIA GI model is more of a blank canvas.

Why 9mm?  Well, I already have a 1911 in .45ACP, and I shoot a lot more 9mm, like 12 times more.  I have buckets full of 9mm brass.

The pistol came in a plastic hard case with one Mec-Gar 10-round magazine, and a chamber flag.  That's all.  The recoil spring is about 12 pounds, and the bushing is loose in the slide, so you really don't even need a bushing wrench.  A G.I. style L-shaped tool (as shown in photos above, purchased separately) with a slotted screwdriver and pin punch would be a nice and inexpensive addition for detail stripping and tightening grip screws (more on that a bit later).

Out of the box, I measured the trigger pull at 4 pounds, 10 ounces, which puts it about half way in the advertised range of 4-6 pounds.  A trigger job got it down to a crisp 3 pounds, 10 ounces (EDIT: trigger job settled in to about 3 pounds after a couple thousand rounds).  I couldn't get any lower without hammer follow or making the reset weaker than I would like.  The hammer and sear are cast or probably Metal-Injection-Molded (MIM).  The hooks on the hammer were not terribly long, but they were pretty rough, and hooked (not 90-degrees).  The sear had a smooth edge, but no break-away cut.  I'm not sure how long that trigger job will last.  Hammers and sears EDM cut from hardened steel will last much longer than cast or MIM parts.

Stocks are completely smooth, plain wood with a surprisingly low density.  They almost feel like balsa wood.  I think they are comfortably sized, but provide no traction.  I did have the grips screws (plain slotted) loosen frequently with the wood panels, and I believe this was due to the screws sinking into the soft wood over time.  I know these are only a cheap placeholder, so that's all I'll say about the grips.

The pistol passed safety checks - thumb safety blocks the sear, and grip safety blocks the trigger.  I have not had any trouble disengaging the grip safety.  Thumb safety is single-side Colt Series 70 style.  The thumb safety firmly snicks on and off.  Not sure if the firing pin spring is extra power or not, but the firing pin is steel.  I'm not sure that the firing pin would pass a drop safety test the way the Springfield 1911s with titanium firing pins will, although it seems that RIA .38 Super and .45ACP pistols pass the safety test for sale in California, so I could be wrong.

The GI grip safety is not terribly comfortable, even on a 9mm pistol.  The tail on the grip safety is narrow, and is not at all rounded.  I didn't know what was going on, at first.  It seemed like the pistol was kicking far more than a 9mm full-size all-steel 1911 should.  After several shooting sessions, I noticed a callus had developed on the web of my hand.  The hammer was biting me, but not drawing blood.  Bobbing and rounding the hammer and "melting" the underside of grip safety tail make it a much more comfortable pistol to shoot.  After this modification, I fired over 200 rounds in one session with no discomfort.  It's like a completely different experience.  Changing to a commander hammer, and notching the grip safety to clear is a common fix for the same problem.

Although the barrel seems to lock up pretty well, the bushing is quite loose in the slide.  The slide also rattles on the frame a bit.  Best groups were about 2" offhand groups at 50 feet, which is about on par with most service pistols, but not as good as a match pistol.  A bushing that fits tighter to the slide and barrel would likely tighten up groups significantly, and a rear sight with a smaller notch would also help.  There is a lot of light showing on either side of the skinny little front sight.

First groups were about 2 inches high, and an inch and half to the left.  It is my intention to take or send the slide to a gunsmith to have it milled for a Bo-Mar adjustable sight, and have it flat-topped and serrated.  I can drift the rear sight for windage, but have no way to fix the elevation other than filing down the rear sight.  I tried 115, 124, and 147 grain bullets, and it always shoots high.

Reliability with standard velocity round-nose ammo is 100%, apart from magazine-related issues.  147gr flat-points were jammed hard into the ramp at the bottom edge of the barrel.  I got a couple of the flat-points into the chamber to fire, but I gave up after about 6 3-point jams.  The barrel appeared to be throated, and thus you would think would feed flat-point bullets.  That ramp at the bottom edge of the barrel is nearly vertical and the flat points just run right into it and stop dead.  Apparently this is not uncommon, as the manual says to use FMJ only, and other users report that their RIA 9mm pistols won't feed flat-point or hollowpoint ammo.  This is not exclusive to RIA pistols, as there are others with 9mm 1911s with non-ramped barrels reporting the same problem.

I'm debating whether I'm really that interested in buying a ramped barrel.  A good semi-drop-in barrel, with bushing pre-fit (Bar-Sto, Kart, Nowlin. . .) runs more than 50% of the price of the pistol.  The tools to gunsmith-fit a match barrel and bushing alone would cost more than the initial price of the pistol.  Take these costs into consideration when you look at pricing of something like a Dan Wesson, Les Baer, or STI pistol which might set you back $1200 or more.

My 7 magazines drop free.  Getting the slide to lock back with the three Metalform magazines required bending the tab on the follower out to the left side.  The steel follower of the Mec-Gar has the same problem, but can not be adjusted.  I may try to get Mec-Gar to send me one of the newer plastic followers, and see if that works better.  My 3 Chip McCormick 10-round magazines have been working well, so far.

Modest bevel on the bottom edges of the slide, except for the slide catch notch, which is left square.

The magazine well is modestly beveled.  The bottom edges of the slide also have a small bevel - a nice touch.  Ejector is extended, but I believe that all 9mm ejectors are extended.  The pistol comes with a flat steel (not plastic) mainspring housing without any silly lock, although I changed it out for an arched Colt mainspring housing, because I'm used to the hump on a Glock grip.

Finish is a decent-looking and even dark-grey phosphate (Parkerized), at least it was before I clamped the slide in a vise and had to wail on the rear sight for 25 minutes to get it to move just a little to the right.  The matte black, "murdered out" look is kinda growing on me.  I added an extended Wilson slide-stop which is a matte blue, and it's a little darker in color, but you'd have to look pretty close to notice.  When I bobbed the hammer and "melted" the tail on the grip safety, I refinished with cold blue, and again, it's not something most people would notice without looking closely.

The bore was also phosphated, which I wasn't crazy about.  After 2000 rounds, I thoroughly cleaned the barrel, including running the Lewis lead remover through a bunch of times and using aggressive solvent.  The barrel now has a dull shine, and the phosphate finish has worn away.  The rifling is sharp and well-defined.  It's not up to the level of an old Colt or Smith & Wesson, or a match barrel, but let's remember that I bought the pistol new for less than $430 out-the-door.  EDIT: After a couple thousand rounds the Park has worn away, but still doesn't have the polished bore of a really good barrel.

Fortunately, RIA no longer puts a giant Rock Island billboard on the left side of the slide.  There is only a small white logo on the left side behind the cocking serrations.  This I will polish out eventually, before I get the slide blued.

As the base for a hobby gunsmithing project, it's a pretty good place to start - that's really why I bought it.  For a range pistol, it's okay, but you're probably never going to draw a crowd unless you paint is pink or zombie green.  For action matches, it will probably do well-enough with an adjustable sight, as bullseye accuracy isn't usually necessary.  The stock sights being actual G.I. style, are notorious for being hard to find.  Because of the feeding problem with non-round bullets, I don't recommend taking it out of the box, and using it as a defense pistol.  Keeping the bargain-basement price in mind, I guess it's not a bad deal.  It's only about 60% the price of a Springfield Range Officer, so you have some money to buy grips, a larger thumb safety, maybe a magazine well and beavertail grip safety and jig, and fit a tighter bushing, if that's what you want.  The Range Officer does come with an adjustable rear sight, fiber-optic front sight, and a ramped barrel, however.

Modifications as pictured - Wilson Combat extended slide stop lever and magazine catch.  Wolff 17 pound mainspring*.  Wolff sear spring.  Colt arched mainspring housing.  Ed brown reduced power mag catch spring.  Nowlin long match trigger.  Fusion small-radius stainless firing pin stop.  ProMag Tough Grips.  EDIT: Added EGW National Match bushing, which installed in about 10 minutes using a Dremel with a cratex cylinder, and a few file strokes on the lug.  The barrel now locks up TIGHT.

I'm not even close to being done with this pistol yet.  My intention is to build an 80's style custom pistol, complete with period holster rig.  Think along the lines of Pachmayr custom shop, Jim Hoag, and Richard Heinie.  Something that would've made Magnum P.I. drool, and considering trading in his Ferrari to free up some cash to get work done on his plain vanilla Mk.IV.  Maybe one of the dumbest ideas I've ever had, because I'll probably never be able to sell it, much less get out of it what I put into it in the 21st century.

Related Links:
Building a Low-Buck Shooter
Brownells Gun Tech - Jack Weigand 2 1/2 pound trigger pull instructions
Armscor/Rock Island Armory Home Page

* - Discovered that the Rock Island 9mm mainspring is 18 pound.  Didn't really need to change it, but I already had a 17 pound spring, and I didn't have to disassemble the RIA mainspring housing, which is a little tricky.

Sunday, March 24, 2013

AGI Video: The Savage Accu-trigger

It's been a while.  I've just been busy, and I haven't come across anything particularly interesting that hasn't already been covered by The Firearm Blog or The Gunmart Blog or anyone else.


Although there really isn't much in the video about tuning the trigger, beyond just turning the screw, the video does show closeups of how the Accu-trigger works, which is kind of neat.

I'd like to have a short-action Savage with a target-model Accu-trigger at some point in the future.  Right-hand bolt, left-side ejection for shooting groups at the high-power range.  I have a couple rimfire rifles that shoot very well off the bench, but nothing staggeringly accurate in centerfire.  I've been spending a lot of $$$ lately, and I really don't have it to spare for a range queen and some good glass, nor do I have the time to work on handloads.

Saturday, January 26, 2013

Vltor CASV-EL Handguard on Kel-Tec PLR16

PLR16 with modified Vltor Handguard.  Spike's Havoc launcher, because Tacticool.

Kinda funny that this should come up a few days after Eric at the Gunmart Blog posted The Definitive List - You Might Be An Internet Commando. . .  I have a Kel-Tec forum membership, because I owned a P3AT for a few months, six years ago.  So when I read, "… if you are a member of the Kel-Tec forum but don’t own a Kel-Tec," on the list, it gave me a big stupid smile.  "I resemble that remark."

Anyway, KTOG member 3badkids posted an illustrated guide on how to modify a Vltor CASV-EL handguard on a PLR16 pistol.  The photo above is the result.  The Kel-Tec front sight becomes superfluous, but you can put whatever BUIS you want on the top rail.  Kudos, for out of the box thinking and ingenuity.

Now, if I could just get my hands on a PLR16, a CASV-EL, an AR stock adapter, and a SBR tax stamp. . . 

Sunday, January 13, 2013

How To Make Home-Made Bump-Fire Stock

Sorry, videos were deleted from YouTube.  Can't really say I blame the dude for doing it.

mattv2099 has finally revealed how he makes those Bumpinator stocks, which are a sort of ghetto, redneck-engineering versions of the Slide-Fire and Bumpski stocks.

REMOVED VIDEO: VIDEO DELETED

Most of the work can be done with a Dremel tool.  I'm not sure about the square tube, but the other hardware you can find at your local ACE or Home Depot.  This one seems to be for the AK/Converted Saiga series of rifles and shotguns, but with a little ingenuity, could be applied to SKS and 10/22 rifles, as you can see in mattv2099's other Bumpinator videos.  EDIT:  Nevermind.  I forgot that the pistol grip is attached to the butt, and not the part of the stock that the action drops into.


Here is Br0dBaNd's home-made AR-15 bump-fire stock.  Because of the way the grip attaches to an AR, you have to do it differently.

(For educational purposes only, obviously, Suburban's Domain not responsible for any damages to persons, or property, bail, lawyer fees, or anything else, and I will not make one for you either)

EDIT, 2/27/2013:  Matt added a new video on how he did the 10/22 Bumpinator.

REMOVED VIDEO: VIDEO DELETED

EDIT, 6/9/2013: He put this one back up.  This is all for now

Wednesday, December 5, 2012

AGI Video: (Really) Excessive Headspace

This may be of some interest to those of you interested in reloading or gunsmithing.

In this video, Bob Dunlap and Ken Brooks from the American Gunsmithing Institute (AGI) take a Mauser rifle, and shoot some 8mm Mauser military ammo, as they adjust the chamber from 0" over the no-go length, to 0.045" over the no-go length (that's 0.051" total headspace).

I thought it was interesting.  Video is almost 25 minutes.  Video quality is not real good though.

If you've never seen case head separation, you'll see some examples of what it looks like.

Wednesday, November 14, 2012

Easy and Cheap DIY AK Safety Mod


I had never thought to use a Chicago screw.  You could substitute a piece of metal tubing if you didn't want to use rubber tube.  I know you can get Chicago screws from MidwayUSA, but I'm not sure if they'd be long enough to accomplish much.  McMaster-Carr has a larger selection.

If you prefer a tab, like the Krebs enhanced safety, you can buy just the tab from Solar Tactical.  If you are going to try and attach it with a couple small Chicago screws, you could use washers for spacers, but it's probably best to use rivets.

Sunday, December 11, 2011

Tuning 5.45mm AR-15 Mags

So far, every C Products and ASC 5.45mm magazine that I've tried has caused jams, straight out of the packaging.  Every one.  Things are okay if I don’t load more than about a dozen rounds, but when I load 20 or 25, I’ll get plenty of stoppages.  Whenever I remember to check, the stoppages have all come when feeding from the right side of the magazine.

This is the typical 5.45mm feed jam. Looks like bolt-over-base.

If you load 5 or 6 rounds (look at both feed lips), you’ll see that the feed lips are holding the case along the full length.  When you get to around 20 rounds in the magazine, you’ll start to see that the lips of the magazine are really only holding the case near the rim.  The left-side feed lips are usually pretty good, but the right-side feed lips have all left the front end of the cases of the rounds without much support.  There seemed to be a logical connection.

You need to be prepared to finish manufacturing the magazine tubes.  In a somewhat rare fashion, I decided that this particular job was better to handle with some finesse, rather than brute force.  Another Spike’s 5.45mm upper owner said he fixed the magazines with a hammer.  I decided to make another magazine lip tool, and I bend the feedlips. . . carefully.  At first, I was just bending the lips to hold the cases of the rounds better when loaded to capacity.  This resulted in about a 50% success rate.  Some of the newly tuned magazines ran fine.  Some still jammed as if I hadn’t done anything.  Some of the magazines would feed up until the 2nd to last round, and then jam.

The problem seems to be related to the angle that the bullets were presented.  With the magazines that worked, the tips of the bullets were only a few millimeters above the front edge of the magazine.  The ones that continued to jam, as if I hadn’t done anything, had the bullets sitting higher.  The ones that didn’t jam until the 2nd to last round, I had bent the feed lips too far, and the tip of the bullet was almost even with the front edge of the magazine.

The modified magazines hold the 5.45mm ammo at the same angle as my D&H aluminum U.S.G.I.-type 5.56mm magazines.  Yeah, I guess maybe I should have checked this earlier.

See how the tip of the bullet in the unmodified mag points skyward.  "There's your problem!"

New strategy.  Take one of the magazines that works, and fix the others to match it.  This seems to be working well.  I think maybe I got this figured out.

Thursday, June 9, 2011

How To Make a Magazine Lip Tool

I wanted a 5.45x39mm AR upper, to shoot some of that inexpensive Russian surplus ammo.  Scored a Spike's mid-length 5.45mm upper from AIM Surplus when they had some in stock.  I've come to find out though, that many of the C Products 5.45mm AR mags are crap.  Most of them work all right, if you load them half way.  However, if I load them with more than 20 rounds, and I got lots of feed failures.

Without getting too deep into the issues with the 5.45mm mags, I'll tell you that the feed lips were part of the problem.  I've been down this road before.

I guess it was back when the only pistol I had was a Ruger Mk.II, that a bullseye shooter told me how to make a mag lip tool from a carriage bolt to keep the Mk.II from jamming bullets into the bottom of the feedramp.

Brownell's sells a tool to adjust AR magazine feedlips for about $13, but a carriage bolt only costs about 60 cents.  It's just a matter of shaping the bolt into a tool.

I'm 90% certain that I made the tool for the Ruger Mk.II tool from a 1/4" bolt.  For the AR magazine tool, I bought a 5/16" bolt.  I could have gone a couple sizes larger, but it gets the job done.  I you have access to key stock, use that, and save yourself a few steps, but the carriage bolts you can pick up at most hardware stores for less than a buck.

5/16" Carriage Bolt, with the head annealed

You've got to cut the flange off the bolt, leaving you with the square. . . lug, at the head of the bolt.  Then you cut a notch in the "lug" to slip over the offending magazine lip and bend into the right shape.  That's about it, really.  If you've got a torch available, annealing and case hardening are optional extra steps.  The annealing helps keep you from chewing up your cutting tools.  Case hardening will help make the tool last longer.

Carriage bolt with the flange hacked off, and the "lug" filed square(ish)
 
"lug" notched to make the tool
 
 Large one for AR-15, small one for .22 Pistol
Tool used for bending feedlips into shape

Friday, December 18, 2009

Midwest Industries T12 Handguard

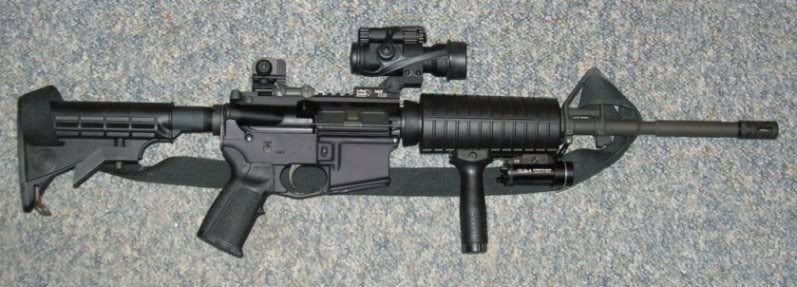
Before - Pretty Basic M4, Aimpoint is a very new addition

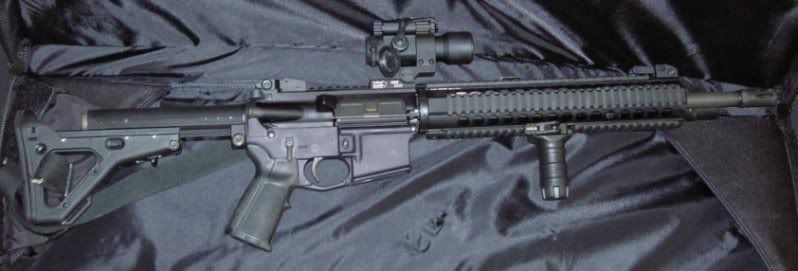
After, along with some other upgrades

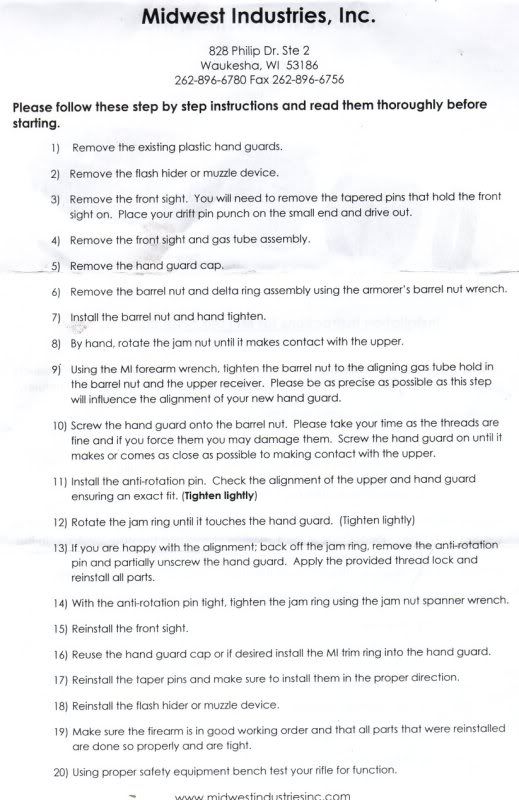
Instruction Sheet


Midwest Industries (MI) is now making one-piece float tubes, in addition to their two-piece, no-gunsmithing, float tubes.  The one-piece tubes use an aluminum barrel nut rather than the steel G.I.-type barrel nut, which saves some weight.  The handguard itself requires less material than a two-piece float tube, saving a little more weight.  The one-piece tubes are also cheaper than the two-piece tubes, at about $155 vs.$228 for the 12" versions.

I was afraid that if I bought one of those $300+ handguards then I’d be afraid to really use it.  That, and I’m too cheap to drop that kind of cash, when I can get almost the same thing for about half the price.  I went with the rifle-length handguard on a 16” barrel because the rail I had bolted to the bottom of the plastic M4 handguard was proving to be too short.  I was pleasantly surprised with the MI Low-Profile rear sight, so I gave MI a shot with the railed float tube.

I’m liking the rifle-length handguard on the carbine upper.  I think I have more muzzle control with the vertical grip mounted farther out from the receiver (like Kyle Lamb says).  The extra length gives more freedom in bracing the rifle against hard cover without the barrel touching anything.  It gives a longer sight radius too, obviously.  It was worth the extra 2 and half ounces (15.4oz., rather than 12.9oz.), over the 10” handguard, I think.  Weight of the 12” Daniel Defense Lite tube (currently $332 at Bravo Company), by the way, is listed at 14oz.  The 12” Lightweight YHM tube (currently $139.95 at Bravo Company) weighs 14.75oz.  Price of the MI T12 at Bravo Company is currently $155, to give you a little bit of a comparison.

The handguard comes with the required Allen wrench for installation, a small vial of threadlocker, and a decent instruction sheet.  It doesn’t come with a spanner wrench for the locknut.  I might have bought a spanner wrench, but there wasn’t any available when I bought the handguard, so I just put the blade of a screwdriver in the slot of the locknut and tapped it with a hammer.  With the help of the threadlocker, the locknut is holding tight, and somewhat to my surprise, the screwdriver didn’t leave a mark on the ring.

Installation on an already assembled upper will require removing any muzzle device present, the gas tube, the front sight tower or gasblock, and finally the delta ring assembly or barrel nut.

Tools required:
1/16” pin punch for the gas tube roll pin
3/32” pin punch for the front sight tower pins (if present)
Hammer – claw hammer at minimum, those front sight tower pins can be tough to start moving
Grease – for removing and reinstalling front sight tower or gas block, and rust preventive on the barrel and steel parts covered by the tube
Degreaser – for cleaning MI barrel nut, lock nut, and anti-rotation screw before applying threadlocker
½” wrench, or large crescent wrench for muzzle device (if present)
Some sort of barrel nut wrench (should be under $25)
Vise
Upper receiver block (Model 1 Sales action block is about $35)
Torque wrench for reassembly (31 foot-pounds minimum, up to 80 foot-pounds is desirable to break-in the threads of the barrel nut, per the TM)
MI lock nut spanner, or hammer and flat blade screwdriver

I removed the sling swivel from the front sight tower, and shaved it into a low-profile gas block which required more tools – drill and 1/8” drill bit, Dremel rotary tool, cut-off wheel, stone grinding bit, files, and black BBQ spray paint.  I don't trust the set-screw type gas blocks, and didn’t want to spend $50+ for a clamp-on gas block.

Don’t forget to order another crush washer for the muzzle device if you want/need to use one.  They aren’t reusable (yeah, I tried; not enough friction to hold the flash hider on).  I think the peel washers are reusable, but I don’t like them, so I’m really not sure.


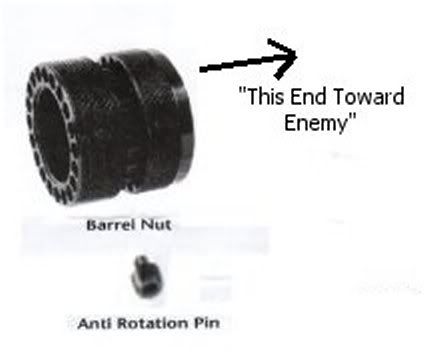
Anti-Rotation Pin Screws Into The Tube, Locking It In Place In Relation To The Barrel Nut

The handguard has an anti-rotation screw, very similar to the ones used with YHM tubes, except that it has a socket head rather than a slotted head.  The barrel nut also is very similar to the YHM nut.

The only issue that I’ve had with fitting things to the handguard was with the Vltor Scout Light mount.  The scout mount fit, but the rails on the handguard seem to be oversized, and the mount would not clamp the flashlight solidly in place without a little shim that I cut from a soda can.  The scout mount worked fine on the rail of a flattop upper, so it’s not the Vltor mount that’s the problem.

The Yankee Hill front sight, MI sling mount, Larue QD scope mount, and Tangodown Quick-Detach Vertical Foregrip all fit fine.

The only real complaint I have about the MI handguard, is the finish.  MI advertises that all their stuff is hard anodized, but I’m finding that it scratches really easily.  I was finding scratches before I even really used the rifle.  Not a big deal, but it might be if you really want a pretty “safe queen.”  The matte black coating on the Larue Beverage Entry Tool has held up to opening many “adult beverages,” so if you want a tube with a tough finish, you might want to give a Larue tube a try.

Non-spec rails aside, the handguard is okay.  It works with many accessories, but not all of them.  My newer YHM Lightweight hanguard seems to be made to the proper spec, and has worked with everything I've tried on it so far.

EDIT, 6/30/2010:
It seems that MI customer service is pretty aweful.  Check MarylandShooter's site for more details.

EDIT, 9/28/2010:  When I went to check the locking ring on the handguard with the YHM spanner wrench, the nut was pretty loose.  It might have been okay, but the wrench does seem to allow more torque on the nut.

Tuesday, October 20, 2009

Ruger 10/22 Tuning and Mods

For whatever reason, this is my most popular article.  I'm resorting to desperate measures here, because it's really important.  As an owner of a 10/22, this is going to impact YOU.  Before you can read about 10/22 tuning and mods, you'll at least have to take a second to scroll down past this stuff.  DON'T SKIP IT!  I'm SERIOUS!!

----------------------------------------------------------
With the failure of the Toomey/Manchin background check bill in the U.S. Senate, it would seem that we are mostly out of the woods on the gun control front.  Try telling that to the poor schmucks in New York and Colorado though.  My point being that the gun-grabbers have taken a serious blow, but are not defeated.

Write to your state reps and make sure that they know that you oppose further restrictions on gun purchases that only affect lawful gun owners and really do nothing to stop crime, mass shootings, or murders
----------------------------------------------------------

Probably one of the easiest and most common modifications to the 10/22 is what most call the “auto bolt release.” The 10/22, as it comes from Ruger, has a unique bolt release. To lock the bolt open, you hold the bolt back, and push up on this lever-type thing in front of the trigger guard. To release the bolt, you pull back the bolt, and then push up on the bolt release again. Releasing the bolt this way is kind of clumsy, at least for those with only two hands. ;) Auto Bolt Release Mod The Ruger 10/22 bolt release can be modified so that the bolt releases with just a little tug on the bolt handle. All you need to do is to cut the canine-tooth-like spur from the big hole in the bolt release. This is not very hard to do with a carbide milling bit (Dremel bit #9901) in a Demel tool. I found that I needed to cut the hole almost to the top edge of the bolt release. That’s really all there is to it. No need to buy an aftermarket part, unless you have to have an extended bolt catch lever. 

The next thing to do is to reduce the trigger pull weight. With most 10/22 rifles, the trigger pull weight actually exceeds the weight of the rifle by a couple pounds. This also is a pretty easy fix. Buy a Volquartsen or Power Custom hammer, and replace the factory hammer. This will very likely reduce the trigger pull from something like eight pounds down to about three and half pounds. The makes it a lot easier to break the shot while the sights are still on your target.

Trigger Group Disassembly/Reassembly Instructions* c/o David Lake of Composite Gunsmithing (which seems to have gone out of business).

JB Weld Mod* Reduce the "take up" in the trigger pull. You can do the same thing with a set-screw, but it's almost not worth the trouble.

Trigger Group Polishing

Glass Bedding the Stock Makes a huge improvement in accuracy when the action is really secure in the stock and the barrel is floated properly.

Extractor Tuning Neither of my 10/22s ran very well before tuning the extractors. They run much better now.

More Trigger Tips* Mainspring strut comes rough, stone that sucker smooth. Check to see if extractor is hitting the notch in the barrel.

Ruger Rotary Magazine Tuning
Mag Tuning
Magazine Sticking I’ve found that they work better for me if I turn the nut 9 flats. That’s not counting the half a flat it takes to start feeling tension on the spring. Like he says, don’t crank down on the screw, or it will bind up the rotor, just turn it ‘til it’s snug. These suckers are finicky, you'll have to work at it a little.

EDIT, 6/9/2013:  One mattv2099 home-made bump-fire stock video.  Unfortunately not the one on how to make the stock.

  My Tack-Driver 10/22. Okay, so this one's got a KID trigger (and barrel too), but the trigger group I tuned went into my plinker/beater 10/22. The scope mount is a Power Custom extended model. Stock is a Bell & Carlson, which I glass-bedded with a Volquartsen pillar, and DIY spacers cut from some old handlebars.

The Tack-Driver and the beater together. I need to take an updated pic of the beater, which now sports a standard Power Custom Weaver-style scope mount and one of my Tasco PDP2 Red Dot sights. It looks nicer with a clear anodized aluminum Tactical Innovations magazine, too. People don't expect the nice target trigger on a plinker/beater gun. Mag dumps are fun and easy. EDIT: Here's the new-and-improved beater.

* - Any and all trigger tuning, and any gunsmithing for that matter, is to be done at your own risk. Firearms with modified actions can be dangerous. In fact, while working on one of the 10/22s, I had a couple rounds go off with the bolt part-way open, which could very well have sent me to the emergency room, or worse.

Sunday, September 6, 2009

Make Your Own Tactical Sling for $10 (Or Less)

AR-15.com Forums: Make Your Own Tac Sling For 10 Bucks
The host for the PDF file seems to either be down, or has pulled the file. I'll try to remember to get it hosted somewhere, and post a link.

The Gun Blogs: DIY 1 point sling

Places to Get Supplies
ITW NEXUS - Order free buckle samples
Strapworks.com - Don't forget to use AR15 discount code for 10% discount - thanks to strapman on ar15.com.
DIY Tactical Store - Same type store as Strapworks, but with some different stuff, like the Cobra buckles.
REI.com - Check for local stores, all I see on the website is some 1" tubular webbing under climbing gear, and it's in bright blue or red.
MFI - HK sling clips

Sunday, June 28, 2009

FAL Last-Round-Bolt-Hold-Open Mod

FAL Last-Round-Bolt-Hold-Open Mod - How-to article with pictures from Alan Eldridge's site.

I discovered this accidentally while searching for a good WECSOG link for the Saiga 12 Pistol-Grip Conversion article. Kinda neat.

Saiga Pistol-Grip Conversion - S-12 Shotgun

I actually finished the conversion more than a month ago, but I didn’t get around to taking pictures until last weekend. The write-up is not 100% finished yet, but it’s been a week since I’ve had anything to post here, so. . .


Parts:
  • Russian American Armory Saiga-12 12-Gauge Shotgun with 19” Barrel
  • Saiga Internal Stock Adapter (I think it was Al’s Custom that made it, but it doesn’t say on my receipt, or the bag it came in, and the part is no longer on the Mississippi Auto Arms site)
  • ACE Pig-Nose AR-15 Stock Adapter
  • Tromix DIY Trigger Guard (With Built-In Pistol Grip Mount)
  • Tapco M4 Carbine-Type 6-Position Stock
  • ProMag M4 Stock Recoil Pad
  • Interarms AK-47 Pistol Grip (Borrowed from another rifle that didn’t need it as a U.S. made part)
  • Interarms Grip Screw
  • Tapco G2 Single-Hook Trigger Kit (Trigger, Hammer, Disconnector)
  • Tapco Trigger and Hammer Pin Retainer
  • 10 Pound 1911 Recoil Spring (For Light Birdshot Loads - Replaces Front Recoil Spring)
Tools Used:
  • Drill
  • Assorted Drill Bits
  • Center Punch
  • Hammer
  • Dremel Rotary Tool
  • Dremel Carbide Cutting Bit (Part Number 9901)
  • Dremel Router Bit
  • Dremel Reinforced Cut-Off Wheel
  • Grandfather’s Vise
  • SAE Allen Key Set
  • Phillips and Flat-head Screwdriver
  • Temporary (blue) thread locker
  • Needle-Nose Pliers
  • Needle-Nose Vise Grips
  • Tweezers
  • Pin Punch Set
  • Coarse File
  • Kart Recoil Lug File (Any Square Needle File W/Safe Edge Will Do)

This is the only gun that I've ever named. I call it Sid, becuase I think it's probably the most Visious thing I own. Nothing, short of a belt-fed machinegun, can remove or destroy flesh and bone quite like a load of buckshot, and this sucker can load up to 13 rounds of buck, and fire them as fast as you can pull the trigger. If you've got the cash, you can pick up a 20 round drum magazine for these Saiga shotguns. When the magazine runs empty, rock-and-lock another one in and cycle the bolt and you're ready to go again.

922r Compliance
The Saiga rifles and shotguns come with funky hollow plastic sporting stocks. For these stocks to work at all, the trigger is moved back from the position it would normally be with a pistol-gripped AK-47. The square hole and slot for a normal AK-type trigger is still there, but it's covered by a piece of sheet metal riveted into place on the bottom of the receiver. This sporting conversion is done to comply with an import ban. Although the company in Russia makes Saiga rifles and shotguns in the normal AK pistol-grip style, they are non-sporting under the language of the U.S. import ban.

But wait! There's a catch! The ATF allows for conversion from sporting configuration, to the pistol grip configuration, as long as 10 or less of the parts they've listed are imported. When you add these domestically-made parts, the firearm changes from an imported gun, to a U.S.-made gun. Yes, it sounds kinda dumb, but don’t knock it! It’s kind of a nice loophole to have in a ban.

In my case, changing out the hammer, disconnector, and hammer make the shotgun a legal domestic firearm if I use American-made magazines. Add a U.S.-made pistol grip and stock, and I can use any magazine.

I had originally planned to buy one of the stock adapters with the mount for a pistol grip, so I wouldn't have to do the full-bore pistol grip conversion. That would have required more expensive U.S.-made conversion parts. Handguards run about $60, and the gas pucks are around $40. It's actually cheaper to do a proper conversion, if you can drill out the 3 rivets that hold the cover on the bottom of the receiver. You end up with a shorter shotgun and a better trigger in the end anyway. The stock Saiga trigger pull is really heavy. The Tapco G2 trigger is much better, better than many AR triggers even. I would have ended up doing the conversion properly eventually, and would have been stuck with used parts that no one really wants.

I think I managed to do the conversion without buying any tools. I used a Black & Decker hand drill that I bought from Wal-Mart a few years ago for something like $25. I did chew into the receiver some, drilling out the rivets, but the trigger guard and button-head screws covered up those little sins. The rivets didn't give me too much trouble. Cheap DrillMaster bits seem to have worked fine.

Tricky Bits
The first issue was drilling out the trigger pin rivets. Damn things will spin on you, and the drill bit doesn't do it's job. This is where the needle-nose vise grips come in. You need something to hold the pin/rivet in place as you drill.

The stock adapter required a lot of modification, even though it's made for the Saigas. The first issue I noticed was the lack of a slot for the key of the AR-15 stock adapter to seat in. I put the adapter under the drill press, and cut some holes, and then used the trusty Dremel to make the holes into a slot. I also had to notch the internal stock adapter to clear the FCG pin retaining wire. When all that was done, it got lightly sanded, and given a coat of Krylon Black BBQ paint. I’m actually not quite done with that; the receiver cover scrapes away a little more paint off the top-rear block every time I put it back together. I’ll have to cut down that ridge when I get the Ace folder mechanism and repaint.

The hardest part of the conversion was getting the lower put back together with the bolt hold open (BHO) lever. I wrestled with the springs to get the trigger and hammer pins in, then I installed the stock, putting threadlocker on the screws. THEN, I pushed on the hammer pin, discovering that the pin retaining wire wasn't working properly. With the stock adapter holding the retaining wire in place, I had to take it all apart, and start all over.

I don’t know how the Russians get damn things together. Getting the parts in under spring pressure without the safety in place is frustrating. They must have assembled it with the safety, because the BHO lever blocks off the slot in the side of the receiver otherwise, and then you can’t get the safety in. Notching the BHO lever to allow inserting the safety doesn’t seem to hurt, so that’s what I did. This is where the Dremel Carbide Cutter bit comes in. But don’t put away the Dremel and bit yet, with the pistol grip conversion, you’ll find that your trigger finger (or maybe thumb for lefties) is making contact with the protruding button end of the BHO lever. You may want to trim that BHO button down about a quarter inch.

Time?
I got the conversion done over the course of one weekend while catching up on TV. I would probably have gotten it done in a matter of hours if I hadn't been running up and down the stairs, going from the basement to the couch and back again and again. I didn’t have a spare AK grip at the time, so I modified an old FAL grip to work (in true WECSOG fashion), which added about a half hour to the conversion process. Then I got a Romanian AK-47 parts kit (for another build), which freed up a proper AK-47 pistol grip, but I had to cut the grip screw down to work with the Tromix Trigger Guard.

Saiga 12 Magazines

The Russian American Armory 5-round magazine that came with the shotgun is similar in size to a 30-round AR-15 magazine. So far, this seems to be the most reliable magazine that I've used in this shotgun so far. This is what I keep loaded with Federal LE 2 3/4" 00-Buck shells, until I can get some 3" buckshot shells.

The 8-round Surefire magazine is similar in size to a 30-round AK-47 magazine. The Surefire 8-round is what is shown in the pictures of my shotgun at the start of this article. Surefire mags are American-made and count as 3 compliance parts - magazine tube, follower, and base plate. I have had a few 2 3/4" shells hang up on the top of the barrel extension. No problem with 3" rounds yet, because the front end of the shell sits forward of the rear end of the barrel extension, and there's no way for the longer rounds to get caught there. I guess I should take a picture, so that you can understand what I'm talking about.

Size Comparo Shot. From left to right:
  • 12-round Surefire Saiga 12 magazine in bag
  • 10-round Promag Saiga 12 magazine
  • 8-round Surefire Saiga 12 magazine
  • 5-round RAA Saiga 12 5-round magazine
  • 30-round AK-47 magazine
  • 30-round AK-74 magazine, 5.45x39mm
  • 30-round MagPul PMag AR-15 magazine
Related Links:
Saiga .223 Conversion – Not quite the same, but gives a good pictorial step-by-step walk through.

How to reinstall the BHO

BHO mod so you can get the safety back in

Making FCG pin-retaining wire from Saiga pin-retainer spring

Mississippi Auto Arms – Where I got most of the conversion parts and Surefire mags.

Saturday, February 14, 2009

Converting SKS To Take AK-47 Magazines

I heard about this, and it took me a while to find the information.

Link to Zip File With Conversion Instructions. The file is hosted by Simonov.net, but it took me a while to find a link.

I think Dad's Chinese SKS is a collector's item now. Once I found out that it required cutting and welding on the receiver, I gave up on the idea.

Saturday, January 17, 2009

1911 Build: Adjustable Sight Installed


I drilled and tapped the STI slide today, per BlindHogg's advice, and installed the Wilson BoMar-type adjustable sight. I've posted pictures of the assembled pistol before with the sight, but it was only slotted into place without the elevation adjustment screw.

It went much smoother than I had thought it would. The divot from the larger drill bit helped guide the one that actually drilled the hole. The bit went through the steel with very little effort. The tap cut the threads without breaking off in the hole (ugh, that really sucks). The edges of the leaf of the sight match up perfectly with the edges of the flat on the top of the slide. It was a high pucker factor job because I was working on the most expensive part of the pistol, but I couldn't be much happier with how it turned out.

The front sight is too tall, so it's shooting about 6" low. I ordered a tall front sight blank, so that I wouldn't end up with one that's too short. It's easier to file a tall front sight than it is to add height to one that's too short.

I was only shooting at about 25 feet, but I was able to get a group without much effort. The hardball rounds and the new lead semi-wadcutter ammo that I've been putting together both hit the same spot on the target. I haven't had any functional problems with either the CheckMate/Colt magazine or the CMC ProMag since the first outing.


I've been filing on the ejector of the M&P, and that hasn't been going so well. No matter what I've done, it's still throwing the brass at me. I seem to be shooting it a lot better than I was though.

I tried 15 and 13 pound recoil springs. I had thought that the 13 pound spring moved ejection more to the left, but I shot with the 15 pound spring again today, and I'm not really sure that there's any difference at all, besides maybe the speed of the ejecting brass.

Monday, January 12, 2009

1911 Build Index

1911 Build Has Started, I Guess - First parts ordered. 1911 build intro.
Snag - Midway wanted $60 for shipping a frame.
Frame Ordered, Really This Time - Ordered Basic frame straight from Caspian
Picked Up The Caspian Frame - . . . after waiting two months. First set of pictures.
1911 Build Progress - Barrel lower lugs not hitting impact surface.
1911 Build Weekend Update - Cutting 1/4" radius on frame tangs, fitting the grip safety, slide is fitted.
1911 Build Weekend Update II - EGW parts order lost, barrel timing.
1911 Build This Week - Changed grips. Basic progress update.
1911 Build: Getting Close To Test Fire - Picture of semi-finished pistol, more barrel fitting.
1911 Build: EGW Order Came In - Last few parts arrive.
1911 Build: It Works!! - First outing with the assembled pistol.
1911 Build: Parts List
1911 Build: Adjustable Sight Installed

Saturday, January 3, 2009

1911 Build: Parts List


The frame is a Caspian Basic in carbon steel. I've reported that.

The slide is an STI 5" "Unique" cut. The slide is milled for a Bo-Mar type adjustable rear sight, and a dovetail front sight. It has a flat top and front cocking serrations. It was made to order, and took a few weeks.

The rest of the parts are as follows.

PART
BRAND/MODEL
SOURCE

Barrel
Kart Easy-Fit, 5" non-ramped
Brownell's

Barrel Bushing
Kart Easy-Fit
Brownell's

Barrel Link
Kart Easy-Fit
Brownell's

Barrel Link Pin
Kart Easy-Fit
Brownell's

Disconnector
Extreme Engineering Ultralight
Shooter's Connection

Ejector
EGW Extended
Midway

Ejector Pin
EGW
Shooter's Connection

Extractor
Aftec
Shooter's Connection

Firing Pin
STI Titanium - .38Super/9mm*
Brownell's

Firing Pin Spring
Wolff Extra Power
Brownell's

Firing Pin Stop
EGW Oversize, Series 70
EGW

Front Sight
Yost Bonitz blank
Midway

Grip Bushings
Cylinder & Slide
Midway

Grip Safety
Chip McCormick Extreme
Midway

Grip Screws
Kimber
(temporary)

Grips
Pachmayr Signature GM-45
Midway

Guide Rod
Wilson 1-Piece, G.I. style
Midway

Guide Rod Plug
"O.E." (Actual Source Unknown), checkered, appears to be dark Parkerized
CDNN Investments

Hammer
Extreme Engineering Ultralight
Shooter's Connection

Hammer Link Pin
EGW
Shooter's Connection

Hammer Pin
Kimber (with groove for "pinned" ambi safety)
Midway

Hammer Strut
Ed Brown
Midway

Magazine Catch Lock
Kimber
(temporary)

Magazine Catch Spring
Kimber
(temporary)

Magazine Catch/Release
Kimber
(temporary)

Mainspring
Wolff 18lb.
Brownell's

Mainspring Cap
EGW
Shooter's Connection

Mainspring Cap Pin
EGW
Shooter's Connection

Mainspring Housing
Ed Brown Maxi-Well, 25lpi Checkering
Midway

Mainspring Housing Pin
EGW
Shooter's Connection

Mainspring Plunger Detent
EGW
Shooter's Connection

Plunger Spring
Kimber
(temporary)

Plunger Tube
EGW bolt-on
EGW

Rear Sight
Wilson Bo-Mar type
Shooter's Connection

Recoil Spring
Wolff (16lb., for now)
Midway

Sear
Extreme Engineering Ultralight
Shooter's Connection

Sear Pin
EGW
Shooter's Connection

Sear Spring
Clark 4-leaf
Brownell's

Slide Stop
Wilson extended
Midway

Thumb Safety
Kimber "Pinned" ambi
Midway

Trigger and long curved shoe insert
SVI
Brownell's


Except for the hammer pin which came with the thumb safety, and the barrel link pin which came with the barrel, the pins and plungers all came in a set.
Some parts were borrowed from a Kimber 1911, until I get around to buying the rest of the parts.
Barrel, bushing, link, and link pin all came as a set.
Hammer, sear, and disconnector came as a set.

* - all STI Slides are set-up for .38Super/9mm firing pins