Friday, December 25, 2009

John Farnham on "Convenient Fantasy"

You're probably not as safe as you think you are.

I've been reading through John Farnham's Quips from the Defense Training website.  The following is from his quip entitled, "Convenient Fantasy."
When you are not continually equipped and prepared for an instant, precise, and lethal counterattack, any "safety" you're imagining is a convenient fantasy. Like cheap insurance, it all works just fine- until you have a claim! Enjoy it while you can.
I suggest that you read the quip.  It will only take you 40 seconds or so.


Oh, and Merry Christmas!

Friday, December 18, 2009

TangoDown Stubby QD Vertical Foregrip


TDI/CAA K-Grip and TangoDown Shorty Grip

The TangoDown Shorty VFG is interesting in that it’s not round, or symmetrical.  Some thought was put into making it ergonomic.  The length of the grip is just long enough to get my whole hand around, but it’s not really designed for you to put your thumb around the back of the grip.  The stubby grips are really for people who put their weak-hand thumb pointing forward on the weak-hand side of the carbine.


Bottom View Of Grip Showing Teardrop Shape


Weak-Hand Thumb Forward VFG Grip

The o-ring-sealed compartment in the grip is just large enough to hold 2 CR123 lithium batteries, while still being sealed watertight by the o-ring.

The quick-detach mechanism is made by American Defense Manufacturing.  To remove the grip, you push in the release button and flip the lever out ninety degrees.  You can then pivot the grip off the rail without sliding it off the end of the rail.

I think the QD lever is worth the small increase in price over the standard TangoDown VFGs.  I can remove the grip to get the carbine into a rifle case, if necessary, or just to shed weight.  I can also swap it over to other firearms quickly, without tools or removing rail covers.  It’s also compatible with a wider variety of non-spec rails than the standard VFGs.

I like the QD lever of the Larue products a little better than the ADM lever, but the ADM lever is quicker and easier to adjust.  The Larue locking mechanism is more positive.  It’s possible to only partially press the button of the ADM lever, which won’t allow you to move the lever.  However, adjusting the Larue lever required a wrench and some trial-and-error.  The ADM is quick and easy to adjust by turning the screwhead opposite the lever.  The ADM clamping system is less likely to mar your rails than the steel tab of the Larue locking lever that actually holds the mount or VFG to the rail.  The big tab on the bottom of the steel Larue lever bears directly on the rail.


Larue QD Lever Mechanism Compared To ADM QD


ADM QD Clamp Adjustment Screw


Standard Larue Locking Lever, Showing Adjustment Mechanism

I’m not going to get into testing durability.  TangoDown grips have been around for a while, and have taken some serious abuse by military and civilian users.

Midwest Industries T12 Handguard

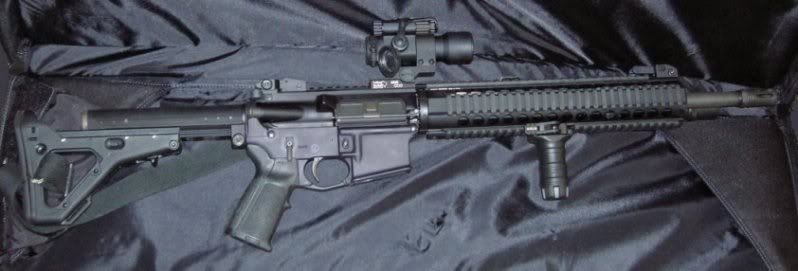
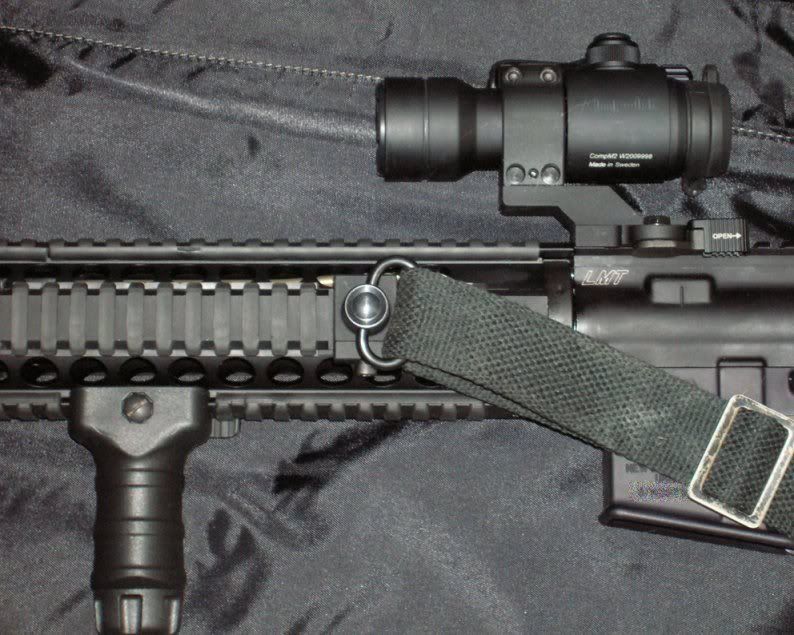
Before - Pretty Basic M4, Aimpoint is a very new addition

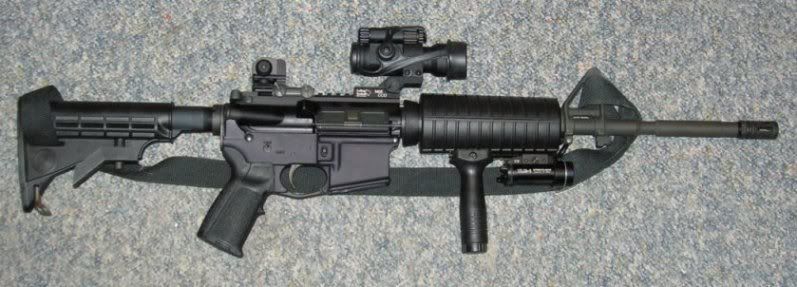
After, along with some other upgrades
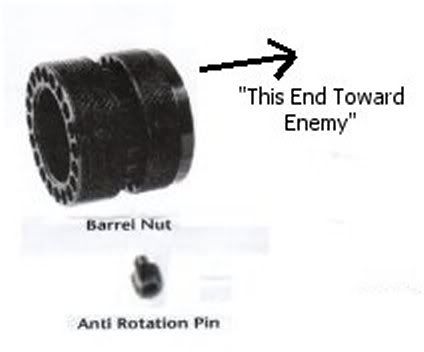
Instruction Sheet


Midwest Industries (MI) is now making one-piece float tubes, in addition to their two-piece, no-gunsmithing, float tubes.  The one-piece tubes use an aluminum barrel nut rather than the steel G.I.-type barrel nut, which saves some weight.  The handguard itself requires less material than a two-piece float tube, saving a little more weight.  The one-piece tubes are also cheaper than the two-piece tubes, at about $155 vs.$228 for the 12" versions.

I was afraid that if I bought one of those $300+ handguards then I’d be afraid to really use it.  That, and I’m too cheap to drop that kind of cash, when I can get almost the same thing for about half the price.  I went with the rifle-length handguard on a 16” barrel because the rail I had bolted to the bottom of the plastic M4 handguard was proving to be too short.  I was pleasantly surprised with the MI Low-Profile rear sight, so I gave MI a shot with the railed float tube.

I’m liking the rifle-length handguard on the carbine upper.  I think I have more muzzle control with the vertical grip mounted farther out from the receiver (like Kyle Lamb says).  The extra length gives more freedom in bracing the rifle against hard cover without the barrel touching anything.  It gives a longer sight radius too, obviously.  It was worth the extra 2 and half ounces (15.4oz., rather than 12.9oz.), over the 10” handguard, I think.  Weight of the 12” Daniel Defense Lite tube (currently $332 at Bravo Company), by the way, is listed at 14oz.  The 12” Lightweight YHM tube (currently $139.95 at Bravo Company) weighs 14.75oz.  Price of the MI T12 at Bravo Company is currently $155, to give you a little bit of a comparison.

The handguard comes with the required Allen wrench for installation, a small vial of threadlocker, and a decent instruction sheet.  It doesn’t come with a spanner wrench for the locknut.  I might have bought a spanner wrench, but there wasn’t any available when I bought the handguard, so I just put the blade of a screwdriver in the slot of the locknut and tapped it with a hammer.  With the help of the threadlocker, the locknut is holding tight, and somewhat to my surprise, the screwdriver didn’t leave a mark on the ring.

Installation on an already assembled upper will require removing any muzzle device present, the gas tube, the front sight tower or gasblock, and finally the delta ring assembly or barrel nut.

Tools required:
1/16” pin punch for the gas tube roll pin
3/32” pin punch for the front sight tower pins (if present)
Hammer – claw hammer at minimum, those front sight tower pins can be tough to start moving
Grease – for removing and reinstalling front sight tower or gas block, and rust preventive on the barrel and steel parts covered by the tube
Degreaser – for cleaning MI barrel nut, lock nut, and anti-rotation screw before applying threadlocker
½” wrench, or large crescent wrench for muzzle device (if present)
Some sort of barrel nut wrench (should be under $25)
Vise
Upper receiver block (Model 1 Sales action block is about $35)
Torque wrench for reassembly (31 foot-pounds minimum, up to 80 foot-pounds is desirable to break-in the threads of the barrel nut, per the TM)
MI lock nut spanner, or hammer and flat blade screwdriver

I removed the sling swivel from the front sight tower, and shaved it into a low-profile gas block which required more tools – drill and 1/8” drill bit, Dremel rotary tool, cut-off wheel, stone grinding bit, files, and black BBQ spray paint.  I don't trust the set-screw type gas blocks, and didn’t want to spend $50+ for a clamp-on gas block.

Don’t forget to order another crush washer for the muzzle device if you want/need to use one.  They aren’t reusable (yeah, I tried; not enough friction to hold the flash hider on).  I think the peel washers are reusable, but I don’t like them, so I’m really not sure.


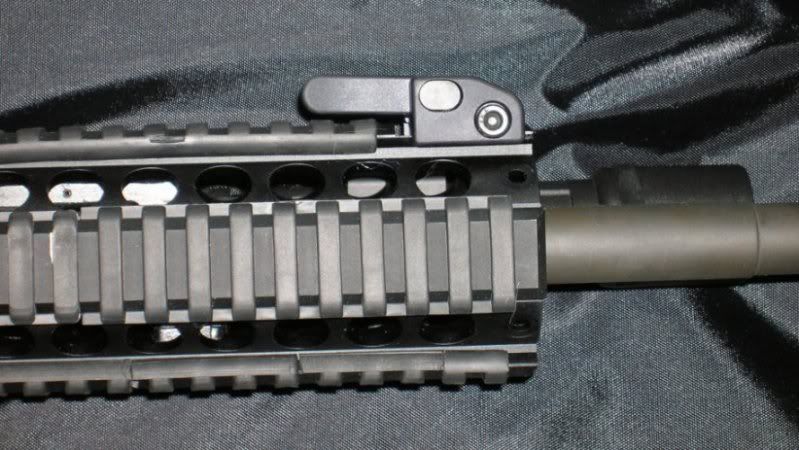
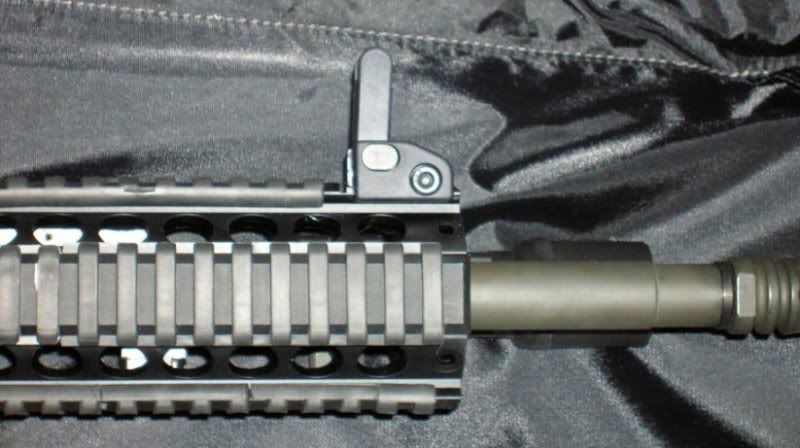
Anti-Rotation Pin Screws Into The Tube, Locking It In Place In Relation To The Barrel Nut

The handguard has an anti-rotation screw, very similar to the ones used with YHM tubes, except that it has a socket head rather than a slotted head.  The barrel nut also is very similar to the YHM nut.

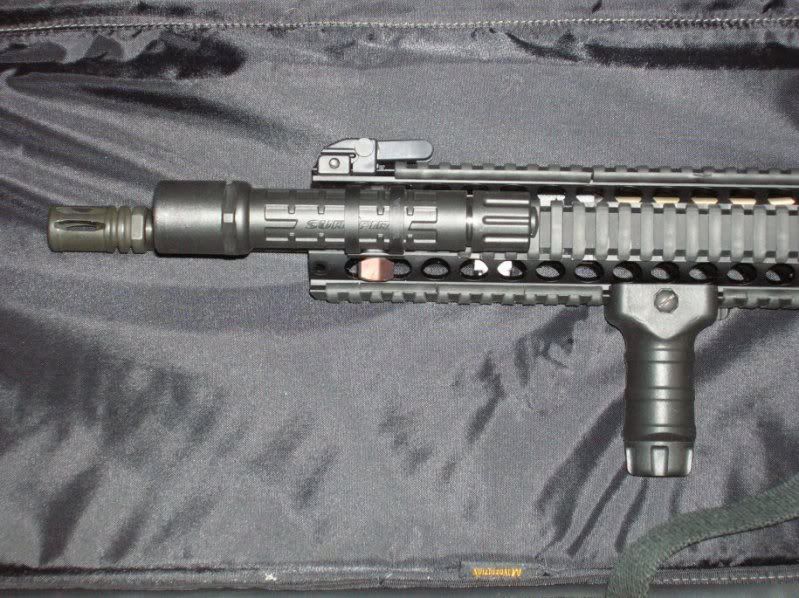
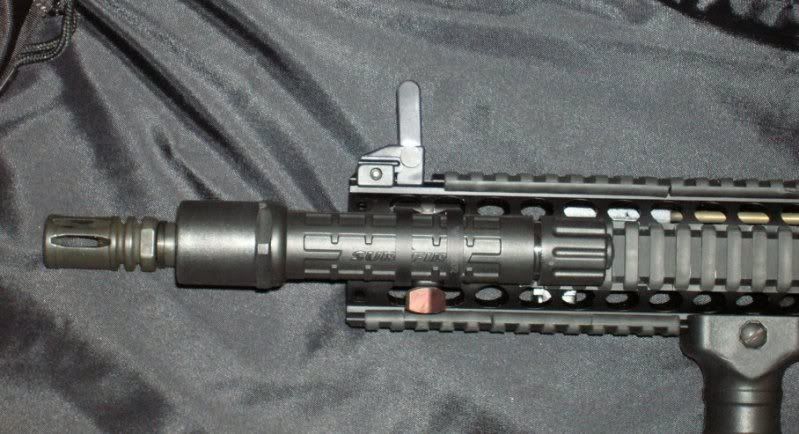
The only issue that I’ve had with fitting things to the handguard was with the Vltor Scout Light mount.  The scout mount fit, but the rails on the handguard seem to be oversized, and the mount would not clamp the flashlight solidly in place without a little shim that I cut from a soda can.  The scout mount worked fine on the rail of a flattop upper, so it’s not the Vltor mount that’s the problem.

The Yankee Hill front sight, 
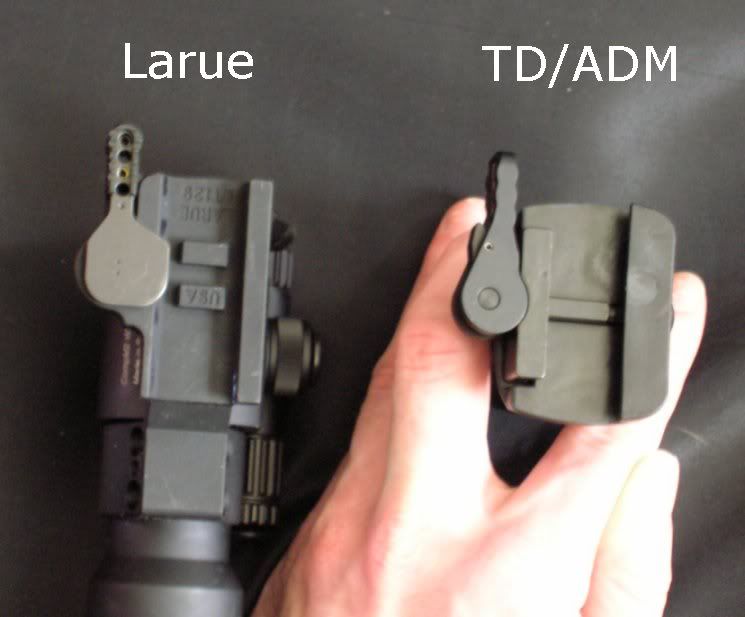
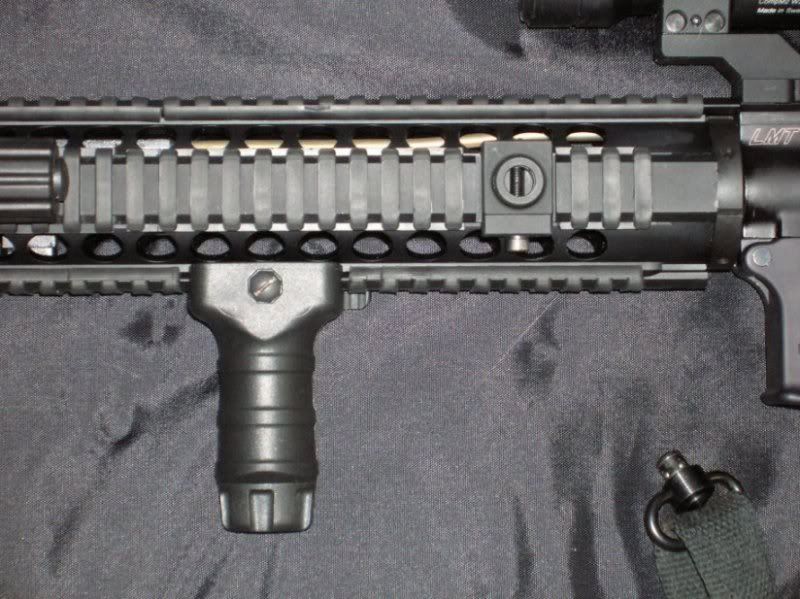
MI sling mount, Larue QD scope mount, and 
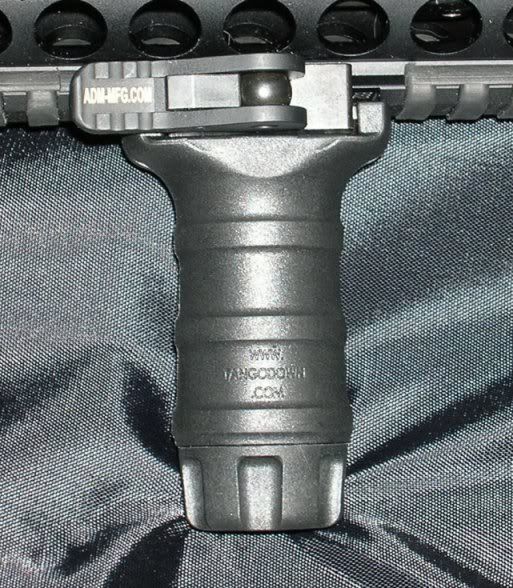
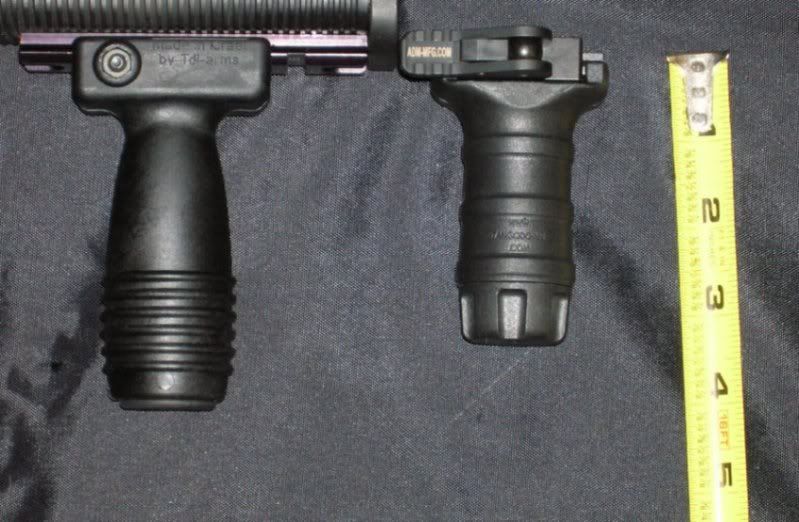
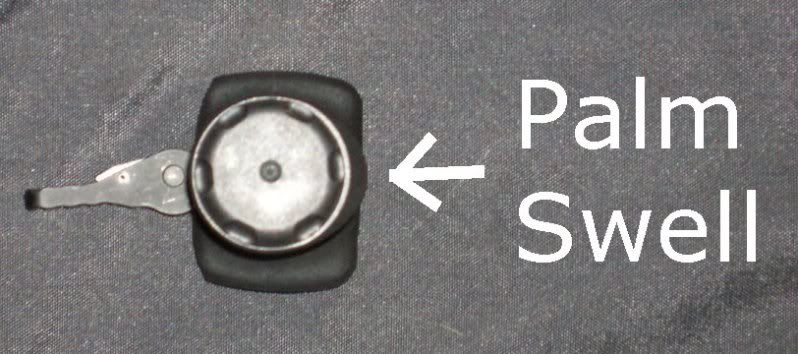
Tangodown Quick-Detach Vertical Foregrip all fit fine.

The only real complaint I have about the MI handguard, is the finish.  MI advertises that all their stuff is hard anodized, but I’m finding that it scratches really easily.  I was finding scratches before I even really used the rifle.  Not a big deal, but it might be if you really want a pretty “safe queen.”  The matte black coating on the Larue Beverage Entry Tool has held up to opening many “adult beverages,” so if you want a tube with a tough finish, you might want to give a Larue tube a try.

Non-spec rails aside, the handguard is okay.  It works with many accessories, but not all of them.  My newer YHM Lightweight hanguard seems to be made to the proper spec, and has worked with everything I've tried on it so far.

EDIT, 6/30/2010:
It seems that MI customer service is pretty aweful.  Check MarylandShooter's site for more details.

EDIT, 9/28/2010:  When I went to check the locking ring on the handguard with the YHM spanner wrench, the nut was pretty loose.  It might have been okay, but the wrench does seem to allow more torque on the nut.

Saturday, December 12, 2009

Yankee Hill QDS Folding Front Sight


Why the M4-type ears, instead of the HK-type wings that wrap around the front sight? The same reason Chuck Taylor warned about the rings around HK front sights, and why Noveske was psyched when Troy released their M4-type front sight. The front sight is not necessarily centered in the ring, or semicircular wings, and in a snap-shot scenario, you might try to center the ring or wings in the rear sight, rather than the front sight itself. This would result in a bullet going somewhere you hadn’t intended.

When I first started fiddling with the sight, I was a little concerned. The button was stiff, and the sight was harder to deploy than I would have liked. After playing with the switch-sightblade (yeah, I know, sorry) for a little while, it loosened up, and it’s now quite acceptable.

You push the button on the side, it flips up, and locks in place. I'm a little afraid that a hard knock might do some damage, since it locks when unfolded, even though it doesn't need to lock since it's spring loaded. Maybe I'll take it apart and fix it so that it doesn't lock open someday.

I unscrewed the A2 front sight that came with the sight, and installed the Trijicon front sight with tritium insert that I had in the standard A-frame front sight base (that I hacked off). I got the carbine sighted in pretty quickly. The front sight isn’t hanging far above the wings, and I didn’t have to make any significant adjustments to the rear sight.

The sight comes with the required Allen wrench for mounting the sight, and it clamped onto my Midwest Industries handguard with no issues.

Although I would prefer a sight that doesn't lock when deployed, it does lock when folded, which I did want, and I wasn't thrilled with the wings or locking designs of many of the competing flip-up front sights. I took a bit of a gamble on the Yankee Hill sight, and it paid off. Next time I need a clamp-on front sight, I think I’ll be buying another one of these.

Saturday, December 5, 2009

Midway Coupon Codes for December

Looks like there's currently two valid coupon codes for $10 off orders over $50. Codes are 1050119 and 50129. Dunno when they expire though.

Update, 12/5/09

GunBlast has a review of American Tactical Imports (ATI) T-14 .410 AR-15 Shotgun Upper, which I mentioned back in July. It looks like Mr. Quinn was using the 13-round magazine, so they must be available somewhere in the U.S.

Also from GunBlast, a review of the Taurus TCP .380 pocket pistol, which I mentioned back in July. I kind of forgot about that pistol. I still don't think I've ever seen one in person. Unlike some other similar pistols, the Taurus locks open after the last round, and the pistol reviewed had a trigger pull that measured around 4 pounds (compared to the usual trigger pull of around 8 pounds). This one might be interesting.

I gave up trying to fix the M&P, and had the shop send it back to S&W for warranty work.

Got another Millet DMS-1 Scope from Midway to replace the dented one. As soon as I can get my hands on a American Defense Manufacturing Recon-X scope mount, I'll get to testing the scope and mount. I made sort of an interesting observation while fiddling with it, that with the power ring set to 1x, the scope actually seems to make things look smaller. True 1x seems to be somewhere between the 1x and 1.5x markings on the power ring.

I still have a couple or few reviews to post. Should have them put up by next weekend.

Friday, December 4, 2009

Midwest Industries MCTAR-08HD Front Sling Swivel


MI Part: MCTAR-08HD

I went with the heavy-duty MI quick-detach sling mount over the others after reading the Military Morons review which stated that the heavy-duty model had stops that keep the sling from twisting. The mount itself has stops that limit the sling swivel from making more than a quarter turn. I like this feature a lot, and I wish all QD sling sockets had this feature.

The mount is a fairly simple device. There are two pieces held together with an Allen-head socket screw. It works on my MI railed tube, obviously, which has rails that are a little oversized, but it also fits true 1913 Picatinny spec rails.

The only thing I feel the need to warn you about is that the screw will probably scratch the finish on the rail you mount it to. The screw threads left marks on my handguard. It’s not a big deal to me. The handguard wasn’t expensive, and the marks are covered with either accessories or ladder rail covers. If you were trying to sell an expensive firearm with integral rails, it might become an issue though.

Thursday, December 3, 2009

Vltor Scout Light Mount


I had been using a Streamlight TLR-1 light on the carbine, but I’m seeing a lot of shooters using Surefire Nitrolon flashlights, usually with some kind of LED upgrade. I tried it out, and I can see several advantages in this method. Some of the LED upgrade bulbs are really bright, and the push-button switches are simpler than the switch on the TLR-1.

A lot of said shooters are using the Viking Tactics light mount. I didn’t think that was what I wanted, as it requires a tool to remove it from the rail, and I wanted something that I could ditch quickly if the flashlight should fail, or if I just didn’t need it. The Vltor mount has a nut that can be unscrewed with only bare hands.

That nut that secures the mount, by the way, is secured to the stud, so that it can’t be completely unscrewed and lost. I wish this was done more often.

The problem with the mount is that it doesn’t work well with rails that aren’t to Picatinny spec. The Midwest Industries rails are a little larger than true Pic-spec, and the mount wouldn’t hold the flashlight securely. The instruction sheet that came with the mount says something about using a set-screw to hold the flashlight in position if the mount in used with non-spec rails, but there was no set-screw included, and there’s no threaded hole for one in the mount. My sort of half-assed solution was to cut a shim from an aluminum can to get the mount to work on my Midwest Industries handguard. I’ve got a couple spare shims stored in the rubber plug of the MIAD pistol grip.